Thursday, August 27, 2015

The Benefits of Yoga

I realize how much I need to practice, and the impact yoga has on my life when incorporated into my lifestyle. I love practicing. I love feeling not only the effects yoga has on my body, but my attitude also. I walk out of class feeling cool, calm and collected. There's really nothing  like it. I've tried yoga in all the different form provided. I love them all. There are days when I just want to relax, slowly move into each pose, and hold. Then there are days I am pumped to enter a room of 100 degrees, moving quickly from one pose to the next, and sweating from places I didn't know I could. [Like the elbow...what? I know right]. If I could start my day with yoga, hot yoga mid-day, and end my day with yoga, I would be one happy lady. One day, when my work hours allow it.

 
--After Class--

https://www.pinterest.com/pin/367254544592023502/
 
--After a few months--
 
https://www.pinterest.com/pin/367254544592023502/
 
--After Years--
 
https://www.pinterest.com/pin/367254544592023502/
 
Yoga has helped me in more ways than one. My mother can tell you, I rave about how amazing yoga is, and how everyone should try it. Not only does yoga help me maintain a healthy weight, yoga has helped me maintain my anxiety. I don't have to take medication, and my panic attacks are fewer and further between; almost non-existent. It's amazing really, feeling stressed the entire day and becoming de-stressed in class. I've tried to think about what was bothering me during class, and find it no longer has the same affect on me as it did. Amazing, right?

Hope you all have a great night!

Monday, August 24, 2015

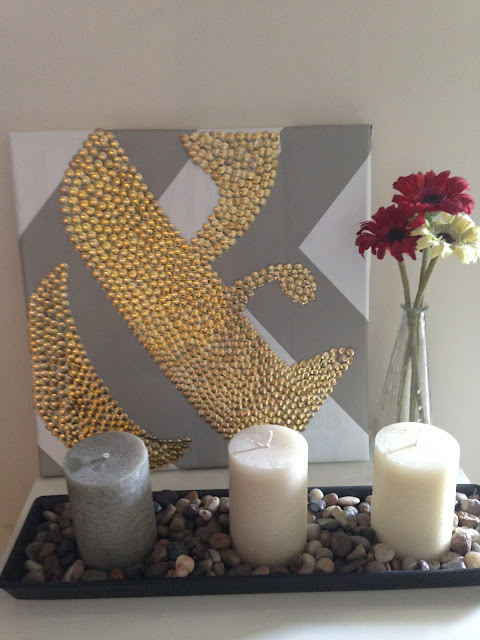
DIY Wall Art: Ampersand

Things are really coming together. I was able to relax most of the weekend, watching TV, and working on projects for the gallery wall. I attempted to re-arrange the furniture in the living room. I was not pleased with what I had pictured would work best for the set-up. Our blue loveseat works wonderfully anywhere that you put it, since it's the perfect size to fit against any wall. Our red couch, however, does not. I really wanted the couch against the window....it would fit if nothing else existed in the room. Oh well, not everything needs to be changed right? I have for you this week, an extremely cheap and easy project. I've shown this before, and you can find the original post, here.


What you will need:
-Canvas
-Thumbtacks
-Pencil
 
I bought the canvas from Goodwill for $1 and bought three packs of gold thumbtacks from Dollar Tree for $1 each. As you can see, my thumbtacks are not all the same gold color. It works though. I put wallpaper around the bar, I'll throw a picture of it up soon. I had left over scraps that weren't needed and wrapped the canvas with it.
Lovely isn't it?
Use your pencil to outline the ampersand. You may want to use
a stencil, I just looked at a picture and went from there
Add your thumbtacks
I outlined the ampersand before filling it in. I had Sean help me with the areas that had wood. They were really hard to get in, and my fingers were really starting to hurt [LOL]. When I asked Sean what he thought, he said that he loved my Viking ship.....what? I guess the way I was holding it was slightly slanted. I looked at him and then my art...turned the canvas a little, and there it was...the Viking ship. He could see the ampersand...after I pointed it out. Oh well, I love it none-the-less.

 
Hope you all have a great day!


Friday, August 21, 2015

Amy Poehler's on point!

http://www.buzzfeed.com/spenceralthouse/ovaries-before-brovaries?sub=3447445_3816211#.tt78ojNON7
I believe, being human, we all struggle with this concept. Working on this daily to be thankful for what I already have. A wonderful family, a loving boyfriend, his amazing family, a roof over our heads that we aren't struggling to afford, food in the kitchen, a job to provide the financial means to afford the things I need and want, as well as the support from friends. I am one happy lady, this much is true. Take a deep breath guys, it's Friday!

Hope you all have a great day!

Wednesday, August 19, 2015

How To: Hide the router and modem

What a weekend! I kept quite busy, and I have a lot to show you all. For starters, Sean and I went to the Studio Movie Grill for date night and saw Fantastic Four. It was actually really good, I would recommend seeing it, far better than the last Fantastic Four. But the Studio Movie Grill make the entire experience that much better. Nothing beats watching a movie while eating dinner, and drinking. Plus, the seats are really comfortable, compared to normal movie theater seating...but I digress. What I am going to show you today, is how I made "faux books" for our router and modem. I found the original source, here. This project was both difficult and easy, depending on the type of book you pick up. I went to our local Re-Store [or Habitat for Humanity, as some know it as]. They have a cart of books outside for 25 cents each. I can't bare to destroy the books I own and love. So I up-cycled a few that someone decided to throw out.


What you'll need:
6-8 Books
Adhesive Super Glue [Dollar Tree: Amazing!!!]
Storage Crate
Scissors
Cut at the corners where the inner cover connects to the binding.
This is the perfect example of a book that cuts easily...
I ran into a few that were glued and gave me a really hard time.

Easy version
 
Glued and difficult version
 
Cut the left cover off
On the right, fold the spine cover over to use a guide for where to cut.
I would use and exacto knife or box cutter here if you have one. I used
scissors, and it was really difficult. Glue the spine to the back piece. 

Choose two books for the ends, and leave the cover on.
Add glue and stick spines together.
 Again,  I did not take a picture, but first glue the spine with the front cover to the left or right of the storage crate. I was alone, and had to hold the cover in place on my storage crate, because my curves and I didn't take that into consideration. In the original tutorial posted above, she uses a wooden crate -- I'm beginning to think she was a genius. The gluing capability would be far easier, but I was cheap and bought a 50 cent storage crate from the Re-Store. Once the cover dries, glue the spines to the front. Once the spines dry, glue the remaining cover with the spine completing the front, and the cover covering the side.

This is what the area looked like before....yuck!
Not too difficult, unless you make it...like me. But I love the way it looks, and that  the router and modem aren't just hanging out for everyone to see. I used a poster our friend Alex made Sean for his 21st birthday. It was the perfect size to cover the wires until I can determine how to untangle them without having to shut everything down. Or maybe we will keep it there...we shall see.

Monday, August 17, 2015

How To Make Homemade Doughnuts

Sean loves doughnuts. Every time I go grocery shopping, I pick up a bag or two of chocolate covered doughnuts. I, however, am not a huge doughnut fan. Fried dough, covered in sugar and frosting...not really my thing. While at Sean's parents house, I found a doughnut recipe, and I couldn't believe that I had all the ingredients already...including the frosting! It's so easy, and takes about a half hour for prep and cook time. I made a few mistakes along the way, as I normally do. But it leads to your success if you so decide to make your own doughnuts at home.


What you'll need:
1/2 cup Sugar
1 tsp Cinnamon
Vegetable Oil
1 can Pillsbury Grand Biscuits
Mix sugar and cinnamon together
Flatten biscuits and cut out doughnut hole. I used a shot glass.
Heat a cast iron skillet with oil. Deep fry dough on a medium-low
heat...found this out the hard way. Dough cooks rather quickly.
Place doughnuts and holes on paper towels.
While still warm, coat doughnut in the cinnamon sugar mis
Add your toppings! I don't own many toppings like sprinkles, etc..but we do have frosting. Sean added syrup to the plain doughnuts and loved them both. I had one plain and one with frosting, so good! I was pleasantly surprised with how well they turned out. One can makes approximately 16 doughnut/doughnut holes. I'm being dead serious when I say this was crazy quick and easy! Try them out this weekend for breakfast!

Have a great day all!


Wednesday, August 12, 2015

My Top 5 DIY Blogs

I'm becoming obsessed with all things rustic. Before we know it, out little apartment is going to have quite the farmhouse feel to it. [Hope Sean is ok with that :)] I think it all started when I completed my first large project; our TV stand. (post here). I have a three day weekend and a paycheck headed my way, so it'll be project heaven this weekend. I will finally get to start [and hopefully finish] the gallery wall, rearrange the furniture, and complete another project I started but was unable to finish.

I've stumbled across a few blog sites that I have come to fall in love with, and would like to share with you.
 
 
Virginia and her husband moved into a home that they completely re-did. I love all the changes they've made, and the details they added. Virginia makes all the changes look so simple. I have found a lot of inspiration from her 50+ Decorating Tips on a Budget, found here. I am looking forward to putting my own spin on a few that I have picked. Virginia uses a lot spray paint for her projects, which I love, because it's not something I would ever think to use. The finish is much more neat than paint. Check out her site, and drool over all the amazing changes she has made.
http://www.livelovediy.com/2014/07/50-budget-decorating-tips-you-should.html
Ampersand Art
http://www.livelovediy.com/2014/07/50-budget-decorating-tips-you-should.html
 
Can I just say [AMAZING]! Everything about Liz's blog is to die for. Liz's husband is quite crafty, and I love the things he creates as well as she. Liz talks about a range of products, from re-purposing furniture, creating your own home décor for everyday or even holidays, to making your own cleaning supplies. I love Liz's style of writing. I love how she adores [as I do] everything she creates as well as her husband. Do you want to know the best part....she's live here in NC! Once you look through all the wonderful things she has to offer, check out her husbands blog also!
Ampersand Art
Deer Head

Antique Sign
Chalkboard Sign
 
These two...every time I have a project in mind, but I'm not sure how to start, I can go to their site and they've done it! I love how Mallory give's her take on how to use an item in one post, and Savannah will use do something completely different in another. Why are you two so amazing?! I'm itching to own a house, I love s'mores, and I cannot wait to make the outdoor serving station.  
Gallery Wall
My current project, and they are offering free printables!
I can't even right now!

 
Outdoor Serving Station

 
I really can't help but fall in love with all things rustic, and Liz brings so much to the table. I spend hours pouring through her site, pinning everything I want to try and re-create. Liz photographs her work beautifully. Everything about her blog is neat and elegant. Liz offers DIY home décor and recipes. Quite the homemaker this one.   
Framed Door Mirror
I bought a plain over the door full length mirror from Target, and am overly excited to use this tutorial and make it look like I actually spent $50. I have a stack of picture frames that I have bought from Goodwill and garage sales that I am wanting to get good use out of. I am finding far more ideas than I imagined possible.
Picture Frame Tray

 
A DIY blog full of budget friendly ideas, you can't beat that. I'm all about making something wonderful for the least amount of money. Scrolling through their tutorials, I'm thinking...I love this! I can do this! Oh...so that's how you do that. They literally walk you through each step, making every project easy to follow and do-able. I know, you hear me say that a lot, but having something seem impossible, and realizing that it is DO-ABLE is something that can't be described. What's even more amazing, these two are coming out with their own show on HGTV! Stop it!
Wall Planter
I have two areas that I want to put a wall planter. I'm thinking succulents in one, and baby's breath in another. Oh my...I seriously wish there was more time in my days off to do more projects!
Blanket Ladder
For $10...Done!


There is far more available, and I could post so much more. But, I will leave it up to you to check them out, and find your own inspiration. They are all amazing, and the step-by-step tutorials they each provide makes DIY projects possible. So I encourage you to create something of your own this weekend!
 
Hope you all have a great day! 


Monday, August 10, 2015

Incubus Concert at PNC Pavilion

I had bought Sean and I tickets to see Incubus months ago. The day finally came, and the concert was amazing! Unfortunately Sean and I had to work the next day, so we were unable to stay for the entire set, but we had a great time with Phi-Phi all the same. It’s been awhile since I’ve been to a concert, and it was Sean’s first time [exciting]. It was fun getting to people watch; we noticed a lot of people wearing tights that were very see-through. Do we dare tell them? We decided to keep track instead. Sean and I like our beer, and neither of us were willing to pay the $11.50 the Pavilion was charging. So we paid $4 for the value market draft; Natty Light. Let me say, Natty Light never tasted so good.

It was so awesome getting to see Incubus live. What's funny is Sean and I had bought chairs at a garage sale, and totally forgot them in the car! Everyone had a blanket, or some sort of sitting device...rookies we are. We will be more prepared next time for sure. Technically we had paid for seats, but decided to sit in the lawn instead. It was a great time, and I'm so happy we were able to make it out.


Hope you all have a great day!

Thursday, August 6, 2015

Gallery Wall Ideas

As I've said in the past, I have numerous projects to work on. I've decided that since one project typically takes me an entire weekend, I am only going to work on one room at a time. I am itching to rearrange the living room to incorporate more space in our one bedroom apartment. The floor plan is very open, which I love, so it's time to play with that space and see what can be done. I am planning on creating a gallery wall behind the TV, incorporating Sean and I in who we are and our life together so far.

Just a few projects that I plan to work on:
https://www.pinterest.com/pin/AWYhW6dS5YIba5Llz3bh8XZyOIw4tD4pq8okmF9fSvnokXoBD8RPu1M/https://www.pinterest.com/pin/367254544584294582/https://www.pinterest.com/pin/367254544591401904/
http://somethingturquoise.com/2012/10/19/diy-giant-scrabble-tile-table-numbers/
 
I can not wait to get started! I love seeing projects and knowing that I can do them! I can't help but smile, in knowing how far I've come and what I am capable of. Let me know if you have any ideas for the gallery wall...I am on the hunt and could use an extra pair of eyes.
 
Hope you all have a great day!