Showing posts with label Tutorial. Show all posts

Tuesday, September 29, 2015

DIY Drop Cloth Curtains

This weekend was busy, but I enjoyed every moment of it! I feel like I allow myself to be lazy during the week, arriving home from work after 7:00 pm doesn't leave much time to do anything. Sean and I usually watch our show and eat dinner, then it's off to bed to start all over. I have been planning on making curtains for the longest time, and finally set the plan to do them. They were so easy! I have a pair of curtains in the bedroom that look almost identical to our new curtains in the living room. I bought the curtain in the bedroom for $14 a piece, plus curtain rods. I went with drop cloth, and paid a whopping $16 for the cloth and drapery clips. I had a curtain rod laying around, which helped with price...but I was happy none-the-less.

Materials Needed
- (1) Drop Cloth
- (2 bags) Drapery Clips
- (1) Curtain Rod & Hardware
- Screwdriver
-Scissors
I bought my screwdriver at target, this one here. I bought the drop cloth and drapery clips from Wal-Mart.
I folded the drop cloth in half, and did my best to cut the cloth in half. The drop cloth is extremely long, so it bunches at the end. I love the length, but it's hidden by the loveseat...so it works. I had Sean put up the curtain rod. I'm extremely short, and can't work overhead very well. Sean and I clipped the curtain to the drapery clips and we were done. We both love how they turned out, and feel that the curtains really bring the apartment together.

I know the pictures are still off, and I apologize. I will receive my charger this week, and I'm so excited!
 
Hope you all have a great day!


Monday, September 7, 2015

How To: Straighten and De-Frizz

I love my big hair. But, like most women, I want what I can't have. Having curly hair is both a blessing and a curse. My hair decides that after using a product that works for a few months, said product will no longer have the same affect...WHAT? I've tried countless of products to tame my unruly hair. Some days are great, some days are good, and some days are bad...so bad. When I straighten my hair, I shave about 15 minutes off getting ready in the morning. I can use the same products, and since I don't straighten my hair everyday, those products go a long way.

When I first started straightening my hair when I was 16, I had no idea what I was doing. It would take me 4 hours to straighten, and because I was so impatient....don't kill me...I would flat iron my hair while it was wet! Ugh! I know, how did my hair not fall off in chunks? I continued to straighten my hair occasionally, 4 hours of straightening really deters one from doing the task often. I did pick up blow drying, but had not been introduced to the world of heat protectant products. I even went as far as relaxing my hair once my freshman year in college....trial and error.

I straighten my hair in the fall and winter months only now, and I've worked a technique that allows me to blow dry and flat iron my hair in 45 minutes - 1 hour. [Much better] Humidity is not my friend, and after going through the process from curly to straight, to have my hair blow up due to frizz...nuh-uh!

So this is for you ladies, who can't seem to get the desired straight look. Or maybe you can, you just need the products to fight the frizz.

How to straighten and fight the frizz:
 

I received a $10 off coupon from Beauty Brands, and in the last hours of use, I snagged the CHI Straight Guard styling cream. I have never used CHI products before, aside from my styling tools, and wanted to see if it was worth all the rage. So far...it's working nicely.


1. Find a hair treatment
Beauty Brands used to sell Liquid Keratin, but do not any longer...made me very sad :( Liquid Keratin's 30 day treatment, fights the frizz, treats, and protects my hair from heat. Keratin is a restorative treatment, strengthening and making the hair more resilient [Borday]. After washing my hair with Liquid Keratin shampoo, I flip my hair over, apply the treatment, and wrap my hair in a bun. This treatment must sit for 30 minutes before heat is applied. After 30 minutes I use a round brush and hair dryer to seal the treatment to the hair follicle.
 
You can find the 30-day treatment here, and Liquid Keratin's new 60-day treatment, here. You can also find the starter set, here.
 
2. Blow Dry
For those of you that are lucky, and can end their straightening experience here...I envy you. My hair goes from a curly mess, to afro. I separate my hair into two sections, and blow dry from root to end.
3. Heat Protectant and Flat Iron
I go back to separating my hair into two sections, and applied the CHI Straight Guard. Separating into two additional sections, pig tail style, secure the side you aren't going to begin with. Start with the underside of your hair and work your way. I take about a half inch to an inch and a half of hair, starting from the root, pull down to the end, and repeat. I repeat this step twice per strand. It's really hard to take a picture of this process when no one is home. But this is what I have...
I hate using clips...although I should. I usually put the section of hair I haven't gotten to into my mouth. Do what works best for ;)
And there you go...no afro, no frizz...straight!
Additional Products I use:
Once the straightening process is complete, I use a dime size of Redken Smooth Lock [which can also be used as a heat protectant] to tame the flyaways, and keep my hair smooth and soft. I bought mine when Beauty Brands had their BOGO product sale, and one has lasted me nearly two years. You can also find it, here.
 
To top it off, I do a quick once over with Mark Hill's Bedazzled which you can find here. It adds shine, smells wonderful, and of course...protects against humidity. I know...that's a lot of humidity protection...but here in NC, it's necessary.


Hope you all have a great night!


Monday, August 24, 2015

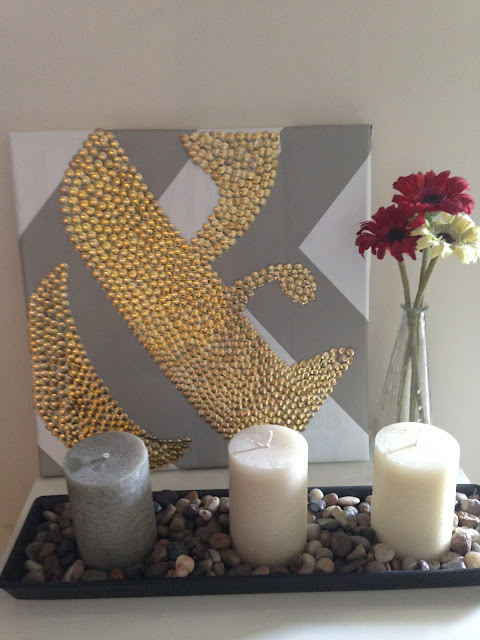
DIY Wall Art: Ampersand

Things are really coming together. I was able to relax most of the weekend, watching TV, and working on projects for the gallery wall. I attempted to re-arrange the furniture in the living room. I was not pleased with what I had pictured would work best for the set-up. Our blue loveseat works wonderfully anywhere that you put it, since it's the perfect size to fit against any wall. Our red couch, however, does not. I really wanted the couch against the window....it would fit if nothing else existed in the room. Oh well, not everything needs to be changed right? I have for you this week, an extremely cheap and easy project. I've shown this before, and you can find the original post, here.


What you will need:
-Canvas
-Thumbtacks
-Pencil
 
I bought the canvas from Goodwill for $1 and bought three packs of gold thumbtacks from Dollar Tree for $1 each. As you can see, my thumbtacks are not all the same gold color. It works though. I put wallpaper around the bar, I'll throw a picture of it up soon. I had left over scraps that weren't needed and wrapped the canvas with it.
Lovely isn't it?
Use your pencil to outline the ampersand. You may want to use
a stencil, I just looked at a picture and went from there
Add your thumbtacks
I outlined the ampersand before filling it in. I had Sean help me with the areas that had wood. They were really hard to get in, and my fingers were really starting to hurt [LOL]. When I asked Sean what he thought, he said that he loved my Viking ship.....what? I guess the way I was holding it was slightly slanted. I looked at him and then my art...turned the canvas a little, and there it was...the Viking ship. He could see the ampersand...after I pointed it out. Oh well, I love it none-the-less.

 
Hope you all have a great day!


Wednesday, August 19, 2015

How To: Hide the router and modem

What a weekend! I kept quite busy, and I have a lot to show you all. For starters, Sean and I went to the Studio Movie Grill for date night and saw Fantastic Four. It was actually really good, I would recommend seeing it, far better than the last Fantastic Four. But the Studio Movie Grill make the entire experience that much better. Nothing beats watching a movie while eating dinner, and drinking. Plus, the seats are really comfortable, compared to normal movie theater seating...but I digress. What I am going to show you today, is how I made "faux books" for our router and modem. I found the original source, here. This project was both difficult and easy, depending on the type of book you pick up. I went to our local Re-Store [or Habitat for Humanity, as some know it as]. They have a cart of books outside for 25 cents each. I can't bare to destroy the books I own and love. So I up-cycled a few that someone decided to throw out.


What you'll need:
6-8 Books
Adhesive Super Glue [Dollar Tree: Amazing!!!]
Storage Crate
Scissors
Cut at the corners where the inner cover connects to the binding.
This is the perfect example of a book that cuts easily...
I ran into a few that were glued and gave me a really hard time.

Easy version
 
Glued and difficult version
 
Cut the left cover off
On the right, fold the spine cover over to use a guide for where to cut.
I would use and exacto knife or box cutter here if you have one. I used
scissors, and it was really difficult. Glue the spine to the back piece. 

Choose two books for the ends, and leave the cover on.
Add glue and stick spines together.
 Again,  I did not take a picture, but first glue the spine with the front cover to the left or right of the storage crate. I was alone, and had to hold the cover in place on my storage crate, because my curves and I didn't take that into consideration. In the original tutorial posted above, she uses a wooden crate -- I'm beginning to think she was a genius. The gluing capability would be far easier, but I was cheap and bought a 50 cent storage crate from the Re-Store. Once the cover dries, glue the spines to the front. Once the spines dry, glue the remaining cover with the spine completing the front, and the cover covering the side.

This is what the area looked like before....yuck!
Not too difficult, unless you make it...like me. But I love the way it looks, and that  the router and modem aren't just hanging out for everyone to see. I used a poster our friend Alex made Sean for his 21st birthday. It was the perfect size to cover the wires until I can determine how to untangle them without having to shut everything down. Or maybe we will keep it there...we shall see.

Monday, August 17, 2015

How To Make Homemade Doughnuts

Sean loves doughnuts. Every time I go grocery shopping, I pick up a bag or two of chocolate covered doughnuts. I, however, am not a huge doughnut fan. Fried dough, covered in sugar and frosting...not really my thing. While at Sean's parents house, I found a doughnut recipe, and I couldn't believe that I had all the ingredients already...including the frosting! It's so easy, and takes about a half hour for prep and cook time. I made a few mistakes along the way, as I normally do. But it leads to your success if you so decide to make your own doughnuts at home.


What you'll need:
1/2 cup Sugar
1 tsp Cinnamon
Vegetable Oil
1 can Pillsbury Grand Biscuits
Mix sugar and cinnamon together
Flatten biscuits and cut out doughnut hole. I used a shot glass.
Heat a cast iron skillet with oil. Deep fry dough on a medium-low
heat...found this out the hard way. Dough cooks rather quickly.
Place doughnuts and holes on paper towels.
While still warm, coat doughnut in the cinnamon sugar mis
Add your toppings! I don't own many toppings like sprinkles, etc..but we do have frosting. Sean added syrup to the plain doughnuts and loved them both. I had one plain and one with frosting, so good! I was pleasantly surprised with how well they turned out. One can makes approximately 16 doughnut/doughnut holes. I'm being dead serious when I say this was crazy quick and easy! Try them out this weekend for breakfast!

Have a great day all!


Tuesday, August 4, 2015

How to: Family Established Sign

This past weekend I celebrated my friend Stacy's birthday. Unfortunately, no pictures were taken, but we had a great time going out for drinks. I was pretty busy the last week, trying to put something together for my mom and aunt. Their birthday was Sunday, and I am happy with the way the signs turned out. The original tutorial can be found, here.

It all started off easy...
I went to Lowe's, and was able to find pre-cut pieces of wood in their lumber section. I was so happy when I found the slabs, because I didn't have measurements, and didn't want to try to guess. I had super glue, and although it worked, I wish I had bought wood glue. I went through the super glue so fast, I had to run back and forth buying more tubes. I bought the paint at Lowe's also. They have small tubs for testing that are perfect! I don't use paint for much, and didn't want to spend a lot on an entire can.
What You Will Need:
4 pieces of pre-cut wood
Wood glue or Super glue
Wood stain
Sponge and Paint Brush
Paint
Shims (used on the back, to allow for hanging)
Stencils - Letter//Numbers//Words//Birds
I laugh at that tiny tube of super glue....what was I thinking.

Add glue and hold the two pieces of wood together.
Add stain and allow to dry.
I was trying to finish quickly, and didn't take my time paint the tree. My aunt told me to take my time, and not to mess up....I was thinking - I got this....
...no I did not...
Be sure to make the trunk and the branches skinny. You want to make sure to leave enough room to add leaves. I used a sponge, and cut out a small leaf. I dipped my leaf sponge in the paint, and applied the leaves.
After looking up a picture online, I drew on a bird...of course with pencil. We all saw the tree disaster earlier. If you have a printer, I would print the bird out and use as a stencil. All the birds will be the same size, and you could print out a smaller bird for the children.
I had to use the back of the board....ignore the barcodes. Fill in the birds with your color of choice!
Use stencils for the words. I used a permanent maker for the last name.
You can also use permanent maker paint...up to you.


You may want to have something to help guide the letters. As you can see, my letter are not spaced well, and it's not straight.....unless you like that sort thing - Do your thing!
That's it! Once again, maybe use a ruler to help you get the stencils aligned. You can also print out what you want said on paper and trace the numbers using a pen to create an indention. I'll show you what I mean on the next project. It'll help keep the letters aligned. Every time I went to the library, it was close. We don't have ink for the printer...so I had to find another way. Also, maybe wait for the stencil to dry if you have to use it more than once. As you can see my 9 is a bit smeared. I love the way it turned out none-the-less.
 
Hope you all have a great day!